KeePassXC with synchronization
Setting up KeePassXC on Linux (with Cloud Synchronization)
Stay open-source, trust no one.
Master Password
The most important thing about using a password manager is to choose a (really, really) strong master password. If you’re not genuinely impressed with yourself when you type it in, it’s not strong enough. The point of switching to a password manager is to have all of your most sensitive credentials in one impregnable place; your bank account, credit cards, mail, social media — whether it’s your assets or your reputation, the dearest information you have is most probably accessible through the internet, ergo your passwords for this information should be as un-hackable as possible.
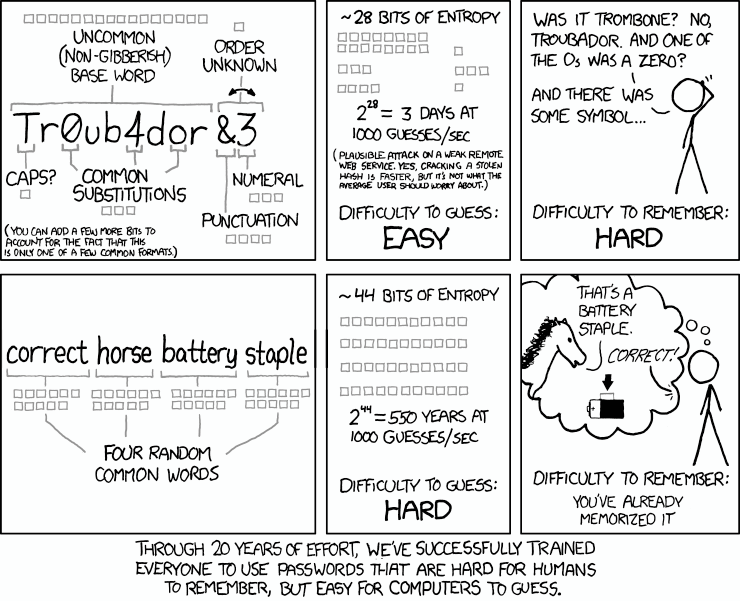
xkcd knows.
In my opinion the best approach in this case, and in many other cases, is to combine: choose four random words that are easy for you to remember, but combine uppercase, lowercase, and special characters as well. E.g. “correct horse battery staple” isn’t much harder to remember than “C0rrEct(hOrse)b@TTery+$7ap13|” once you’ve practiced typing it a couple of times, but the increase in entropy is substantial. It will take you longer to type, but I’d argue the extra minute a day (at most!) is a fair price for securing all of your passwords. Let your muscle memory do the heavy lifting and you’ll be surprised at how easily it comes to you after a few times.
Just to be on the safe side, copy your master password to a physical note and put it in a completely secure place that no one with access to your computer could ever possibly know of.
Key File
Go to Database → Database settings… → Security. Under the Password section at the top you should see a Key File section.

Database → Database settings… → Security
This allows setting or creating a binary file that is used together with or instead of a master password. It is recommended to let the application generate a key file for you, and to copy it to three USB sticks. One you will carry with you, the other two you will keep as backup (in separate locations from the physical backup for your master password!). Having a key file means that even if someone somehow gains access to your password, you have a second form of authentication that prevents them from being able to use it. Again, you pay with convenience, but profit immensely in security. Simply get in the habit of throwing that USB stick in your pocket or backpack when you leave the house to any place where you might need access to your passwords. This should really be limited to perhaps one or two computers you work on. We’ll talk about your mobile phone in a second.
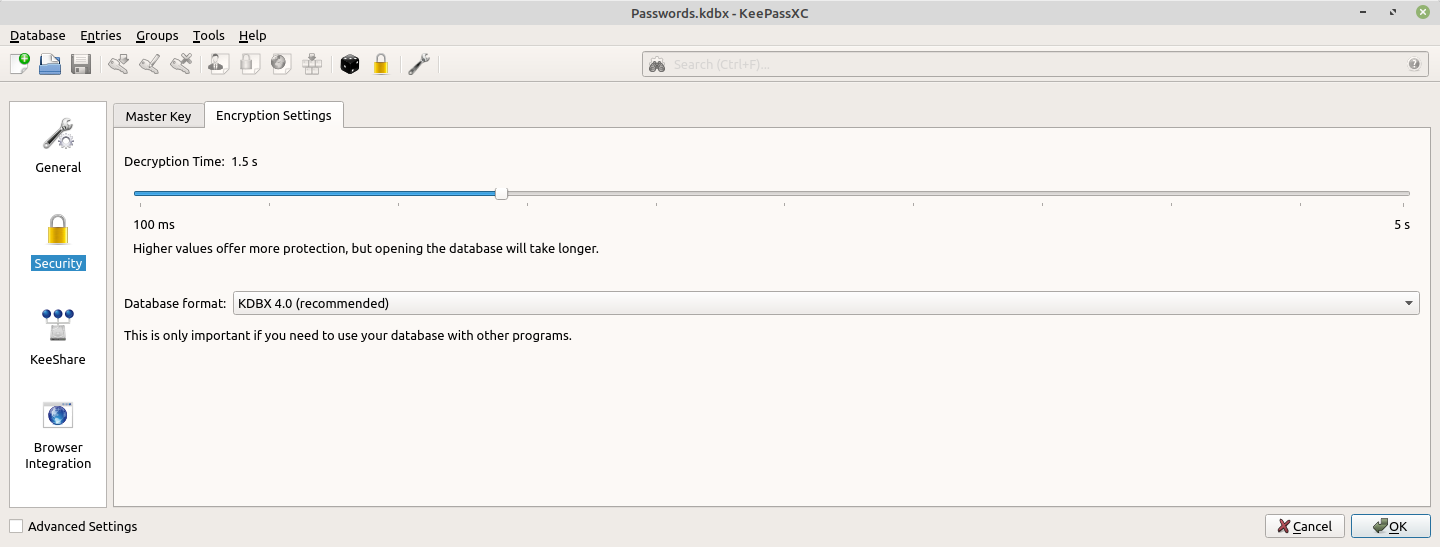
Decryption Time
In the same Database settings… → Security menu, note the second tab titled Encryption Settings. The first field in this tab is labeled Decryption Time and should have a Change button opposite of it. Press the button and validate your decryption time setting is set to at least 1 second. Feel free to give it a couple of extra deciseconds (hundreds of milliseconds) while you’re at it. The difference will be effectively indistinguishable, but the result will be a significant increase in the number of iterations used when encrypting your data, making it much harder to decrypt.
These are the basics. You can also set a default username for new entries (Database → Database settings… → General), which I like to have as my e-mail address, change the time interval for clearing the clipboard after copying passwords (Tools → Settings → Security), decide to show a system tray icon (Tools → Settings → General), and much, much more. Explore and make it your own!
First, you probably want to have your passwords available on your mobile phone. I use Keepass2Android and am very satisfied.
Keepass2Android allows you to set the location of the database file from various cloud services (including Google Drive, Dropbox, OneDrive, ownCloud, NextCloud, and more). However, KeePassXC does not. As stated in the KeePassXC website:
_Why is there no cloud synchronization feature built into KeePassXC?
_Cloud synchronization with Dropbox, Google Drive, OneDrive, ownCloud, Nextcloud etc. can be easily accomplished by simply storing your KeePassXC database inside your shared cloud folder and letting your desktop synchronization client do the rest. We prefer this approach, because it is simple, not tied to a specific cloud provider and keeps the complexity of our code low.
Now it really depends on what cloud service you are using. Dropbox provides a Linux client, and so do ownCloud and NextCloud, but Google Drive and OneDrive don’t offer a particularly straightforward solution for Linux users. Also, you may not want or be able to install your cloud provider’s client in all the computers you need to have access to your passwords from.
EDIT: if you’re using GNOME there actually is a simple method to mount both Google Drive and OneDrive, more information here. Thanks to KeePassXC on twitter, for pointing this out.
This could pose a potential problem, but fret not — Rclone has got you covered.
Rclone
According to Rclone’s GitHub project’s README:
Rclone (“rsync for cloud storage”) is a command line program to sync files and directories to and from different cloud storage providers.
If you’ve clicked on either of two previous links and reviewed the incredible list of supported cloud storage providers, you could almost certainly spot whichever cloud service you might be using as well as just about any other one you’ve ever heard of (and a dozen you haven’t). Most importantly, the list includes any one of the services supported by Keepass2Android.
Installation is as simple as running:
curl https://rclone.org/install.sh | sudo bash.
To verify everything went smoothly you can executerclone --version (or -V) and see that you get the expected output.
Use the instructions on Rclone’s homepage to set up a connection to your preferred cloud storage provider by following the link next to its name. This process is usually quite effortless and mostly entails running rclone config, selecting whichever provider you’re using, choosing a name for the created remote location, and accepting some defaults. To validate your configuration, execute: rclone lsd _name_:, where name represents the name you chose for the remote (cloud) location. This will list all top-level directories within that location. Generally speaking, remote paths in Rclone are specified as _name_:remote/path (which is why _name_: points to the root directory).
Automation
Now that you have established a connection with your cloud storage provider, you need a script to automate the task of checking for updates and importing (if the remote version is newer) or exporting (if the local version is newer). I am not much of a bash scriptwriter, but I’ve come up with something relatively simple that seems to work:
Bash script to automate database file synchronization
All you have to do is download the file (you can also click the “view raw” button and copy directly to a file on your computer) and change the values of the four variables under the “Configuration” title (DRIVE_NAME, DB_FILE_NAME, LOCAL_LOCATION, and REMOTE_LOCATION) according to your setup. I like to keep such bash scripts under ~/Scripts (~ in the terminal is an alias to the home directory). Don’t forget to give the file execution permissions:
chmod +x ~/Scripts/sync-passwords.sh
Alternatively, you can simply run:
cd; mkdir -p Scripts; wget https://gist.githubusercontent.com/ZviBaratz/a4a51544c3d876543d37abfd0c6ee2a3/raw/1b739673cfe168a7c0797bc04e1ab90269c82281/sync-passwords.sh -P Scripts; chmod +x Scripts/sync-passwords.sh
This will change directory to the user home’s directory, create the ‘Scripts’ directory if it doesn’t exist under it, download the GitHub gist, and change its permissions to make it executable. However, don’t forget you still have to change the variables at the beginning of the script to match the name and location of your database file and the name of the cloud storage provider.
Make sure it’s working by running it:
~/Scripts/sync-passwords.sh
Assuming you don’t yet have a remote copy of the database file, you should see something like:

In following runs the output will look like:

Finally, you may want to create a cron job to automate the execution of this script, so that you don’t have to remember running it every time you make a small change. To create a job that runs the synchronization script every 20 minutes, you can run:
(crontab -l; echo "*/20 * * * * $HOME/Scripts/sync-passwords.sh") | crontab -
If you would like to create a different synchronization schedule you can use crontab.guru or learn more about cron scheduling. If you already created this job and would like to edit it you can do so using crontab -e.
Key File
Don’t forget about the key file! Connect your mobile phone to your desktop with a USB cable and copy the key file to your local storage. Open Keepass2Android and under “select master key type:” choose “Password + Key File”. Browse to select your key file from the phone’s local storage.
Once you’ve unlocked your database successfully, click on the options button (should appear as three vertical dots in the top right corner) → Settings → Database, and select “Import database to internal folder”. Having completed that, delete the original version of the key file on the device so that it is not accessible to any other application.